This article will discuss important tips and reminders for our returning schools. If your school does not use Clever to sync student data to CERT, follow this guide to update your CERT account. If your school does use Clever for a rostering and as a single sign-on tool, please skip down to step 9.
Before new students are uploaded to the school account for the current school year, the best practice is to clean up the current data in the account. To ensure students are in the proper grade levels, remove the students who no longer attend the school or are no longer using CERT, upgrade the previous year’s students to their new grade-level, and delete the previous year’s groups use the steps below:
1. Batch Upgrade by File/Field
To promote entire grade levels to the next grade level, choose one of the following options:
Batch Upgrade by File
The first option is to upgrade students by importing an ADHOC created by the student information system, such as Infinite Campus or Power Schools. With this option, all students whose unique logins are included in the ADHOC will be automatically moved to the next grade level. To complete this function, follow the steps below:
- Under the Students tab, scroll down to find the Batch Operations heading in the left column
- Select Batch Upgrade by File
- Follow the guide shown in the screenshot below (step 3) to create the ADHOC
- Upload the file to CERT by selecting Choose File
- Follow the promptings of the file upload
Batch Upgrade by Filter
The second option to upgrade students to their current grade level is to Batch Upgrade by Filter. This will not require an ADHOC, but it will require the completion of this function for each grade level. To complete this function, follow the steps below:
- Under the Students tab, scroll down to the Batch Operations heading
- Select Batch Upgrade by Filter
- Use the filters to select the correct grade level and graduating year
- Click Filter
- After reviewing the list to ensure the students are correct, click Review
- Confirm changes when the dialogue box pops on the screen
**IMPORTANT: The Batch Upgrade by Filter will promote ALL students to the next grade level. It’s important that retained students are noted and “rolled back” to the proper grade level in order to stay in the grade level corresponding to their grade level in your Student Information System. The Batch Upgrade by File will only promote students in the file. Retained students will remain in their current year’s grade level, but that data will need to be reset to give them the opportunity to assess again. To ensure the most accurate student list, Batch Upgrade by File is recommended.
2. Batch Import New Students
Once all current students have been placed in the correct grade levels, new students can be uploaded to the account. Usually, this will be the lowest grade level you serve at your school. To import these students in a single action, follow the steps below:
- Under the Students tab, scroll down to the Batch Operations heading
- Select Batch Import
- Use the links in the blue box titled File Selection to read helpful tips and view samples of an ADHOC in order to create a file to upload using the student data management system
- Once the file has been created, select Choose File to upload
- Make sure "Uploaded Field" and "Import Field" are automatically matched. If not, make adjustments by clicking the Optional Student Fields and dragging them to the corresponding column headings
- Click Confirm Data Mapping
- Fill in the corresponding field for Password
- Click on Review Import
- Click on Complete Import
**NOTE: After confirming data mapping, it’s likely that a list of errors will appear due mainly to students who are already enrolled in another CERT school. This means they have to be transferred to your school from another CERT school by using the migration feature. It’s VERY important to record and save these error messages in order to migrate the students into the school account. See below for steps to migrate students. **
3. Migrate Students from Other Schools
To migrate a student who transferred from another CERT school, follow these simple steps:
- Click Migrate Student
- Enter student login or SSID in the Search box
- Click Search
- Double-check that the correct student is chosen, then fill in any missing or incorrect information for the account and ensuring the student is in the correct grade level
- Click Review
- Click Submit
**NOTE: If an error message occurs stating that the student cannot be moved to the appropriate grade, please contact one of our CERT support staff by email or the chat feature**
4. Change Passwords for All (Optional)
Students, Teachers, and Admins can change their passwords at any time. For ease of getting everyone into the system at the beginning of the year, as many have likely forgotten the previous year’s password, a shared password can be created for all students and/or admin so they can log in and adjust their passwords accordingly. To change all passwords for students and/or admins, follow the steps below:
- Under the Students tab, scroll down to the Batch Operations heading
- Click Change Password
- Select if you’d like to change the password for all Admins/Teachers or all Students
- Type in your shared password of choice
- Click Review Changes and confirm changes
5. Batch Upload Groups
Before uploading new groups to the system, delete the previous year's groups. To do this, follow the steps below:
- Under the Students tab, scroll down to the Groups heading in the left column
- Select View All to see if there are currently any groups that need to be deleted
- If so, select Delete All and confirm the changes
Once last year’s groups have been deleted, upload the new groups by following the steps below:
- Select Students tab
- Under "Student Groups," click on Batch Group Creation
- In the blue box on the right titled File Selection, read instructions and view helpful links to create the necessary file
- Click Choose File to upload the file with student group information
- Make sure "Uploaded Field" and "Import Field" are properly mapped (matched)
- Click on Confirm Data Mapping
- Click on Review Import
- Click on Complete Import
For more information on how to create the ADHOC file to upload student groups using the batch operation, follow this link.
It is recommended that in addition to creating the classroom groups that grade-level groups are also created to make it easier to pull larger reports once assessments are completed. These groups will need to be completed manually. For more information on how to add a group manually, follow this link.
6. Batch Upload Admin
- Click the Admins tab
- Select Batch Import
- Read the guide and view the samples provided in the blue box titled File Selection to create an ADHOC from the student management system
- Upload the file to CERT by selecting Choose File and follow the prompts to upload
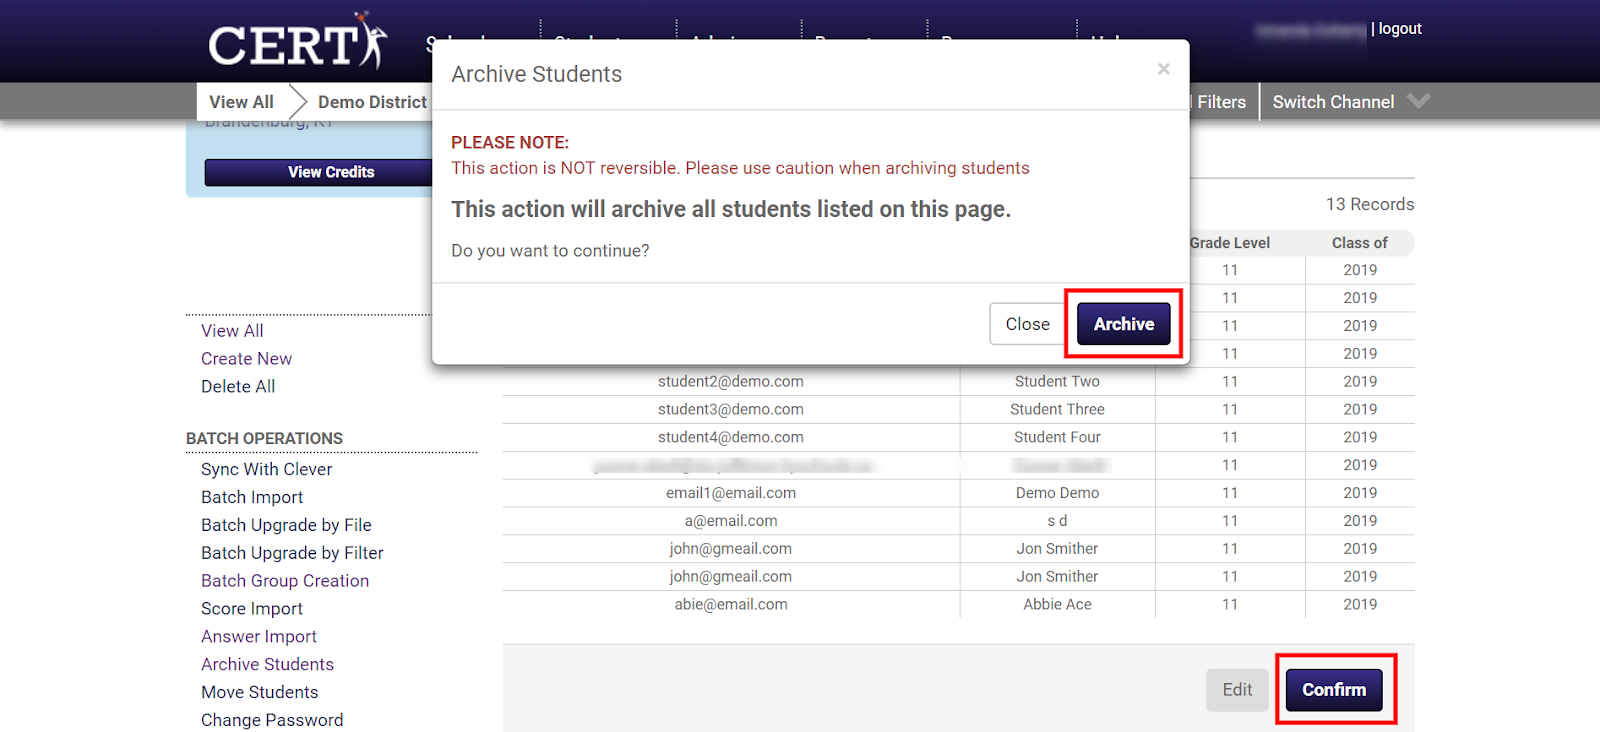
7. Batch Archive Students (If Applicable)
An entire grade level can be archived in a single batch operation. Only archive students if you'd like them removed from your account because they are no longer at your school or not using the CERT program, such as last year's graduating class. Archived students are removed from the Student page but their data will be stored and can be found in the reports:
- Under the Students tab, scroll down to the Batch Operations heading in the left column
- Select Archive Students
- Use the filters to select the correct graduating class
- Click Review
- Review the list of students to ensure the correct class was selected
- Click Confirm
- Select Archive
8. Archive Individual Students
Individual students who transferred to another school or no longer attend the school can be archived by accessing their account information as seen below:
- Under the Students tab, select the student from the student list
- Under the Profile tab, select Archive This Student
- Confirm the action by selecting Archive Student when the dialogue box pops up
9. Batch Archive Student Groups
In certain cases, you may want to retain groups (or teacher classes) created last year. But more than likely, it will be most advantageous to delete all of last year's groups. This will ensure a "clean" list of students when your teachers pull reports and look at class rosters. Follow the screenshot below to Delete All Groups. Please note this is not reversible.